
This is a fairly simple mod to install, but there's no such thing as being too prepared. I highly recommend reading this guide before attempting to install it yourself!
Installation video on YouTube(previous version)
Tools Needed
- Soldering iron
- Solder
- Flux(optional, highly recommended)
- Solder sucker(optional)
Step 1 - Remove original LED
Before installing the new indicator mod, the original power LED must be removed.

To remove the original LED, start by flipping over the board and locating the two pins of the LED as indicated below.

If you have a solder sucker, heat the pins one at a time with your soldering iron and remove the existing solder from the pins. Once the pins are free from the through holes, you should be able to gently remove the LED with a pair of tweezers.
Alternatively, using a larger soldering iron tip, heat both pins of the LED at the same time and simultaneously pull the LED out with a pair of tweezers while the solder is still molten.
In either case, it should look like the below image when you're done. Don't worry if the holes aren't totally clear of solder.

Step 2 - Prepare installation area
Before placing the indicator mod, it's important to do some minor prep work.
Locate the via(plated hole) indicated in the below image -- connected to VCC, aka positive battery -- and pre tin it with some solder. Flux will be very useful here to help remove existing oxidation and help the solder stick.

Tip: If you can't get solder to stick even using flux, gently twirl the tip of a craft knife in the via to expose fresh copper. Attempt the tinning step again.
Step 3 - Solder indicator in place
The indicator will attach to three points on the motherboard, as indicated below.
- The VCC via that you pre-tinned in step 2
- Pin 1(top right) of the EXT port, 5V connection
- The top anchor of the EXT port, GND connection
Tip: You may find it helpful to add some additional solder to the 2 pins on the EXT port.

Carefully place the mod into position, making sure to align the pad on the top of the board with the VCC via that you pre-tinned in the previous step.

Using your soldering iron, carefully solder the three indicated points to the mod. It's generally helpful to hold it firmly until you've tacked down at least one solder point, at which point it should be stable enough to continue soldering without manually holding it in place.
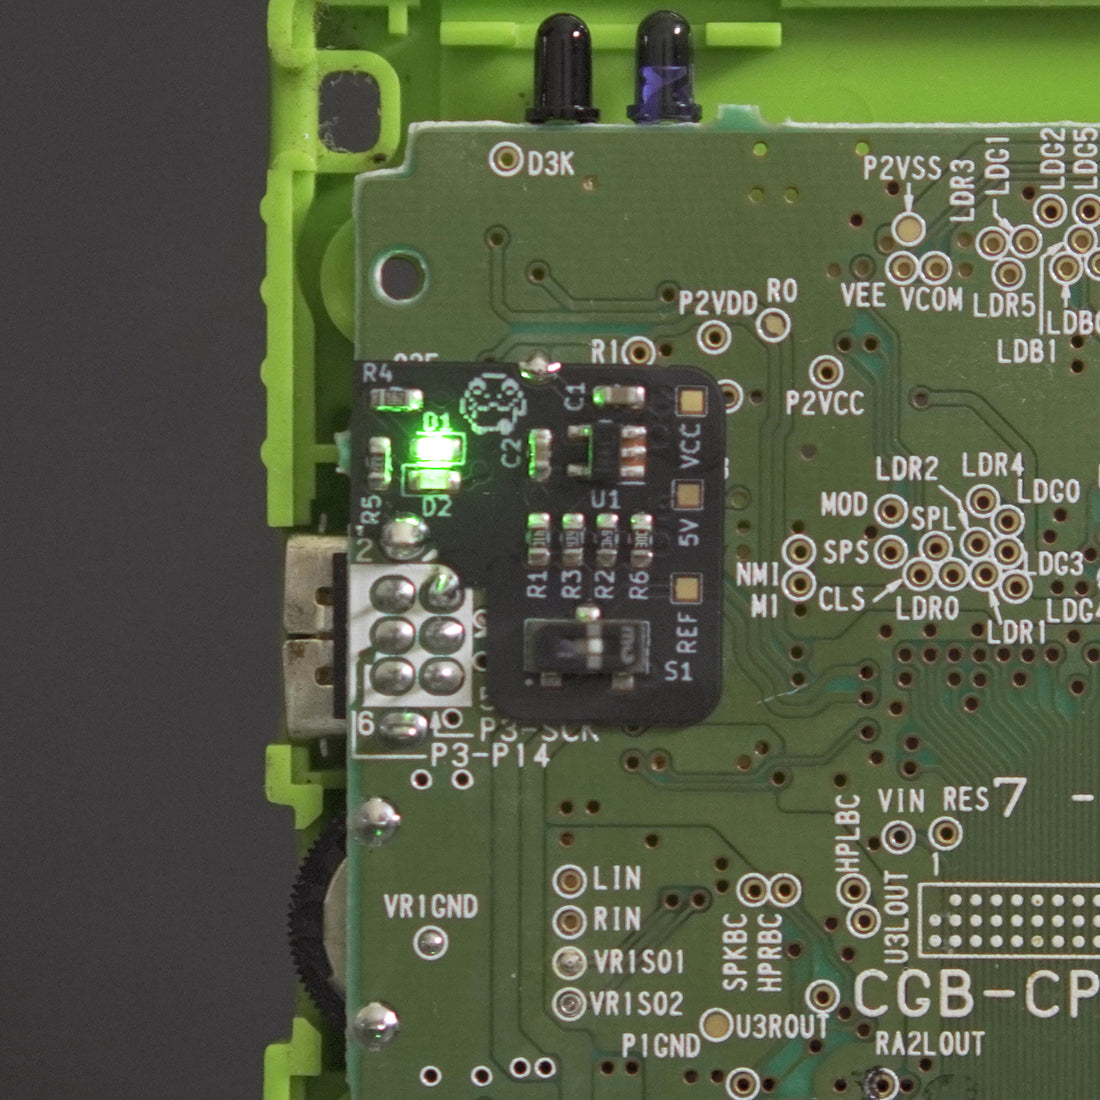
It should look like the following image once you've finished soldering all three points.

Step 4 - Setting voltage threshold
The battery indicator mod has two user selectable voltage thresholds for when the bad battery LED turns on, one to support traditional AA batteries, and another to support single cell LiPo batteries.
The following image highlights the switch used to select which mode to use. The left position is for LiPo batteries, while the right position(marked by a white bar) is for AA batteries.

Step 5 - Place light pipe
Your battery indicator kit should include a small transparent light pipe used to disperse the light. Place this with the flared side up into the hole for the LED in the front of your shell.
That's it! Close up your Game Boy Color and enjoy the frogs of your labor.
Troubleshooting
Only the bad battery LED illuminates, even with fresh batteries
There are two possible causes, with different solutions:
- You're using AA batteries with the mod in LiPo mode. See step 4 to select the correct mode for the type of batteries you're using.
- The VCC via on the mod is not properly soldered to the corresponding via on the motherboard. Revisit steps 2 and 3 and make sure this connection is solid.
The LEDs do not illuminate, or illuminate only dimly
Verify that the 5V connection indicated in step 3 is securely soldered to pin 1 on the EXT port.
The bad battery LED never illuminates when using a LiPo battery
Double check that the mod is in LiPo mode, per the directions in step 4. Running the mod in AA mode while using a LiPo will result in the good battery LED always being illuminated. Alternatively, you may be using a LiPo kit that's doing something unexpected and isn't compatible with this mod. Check out my discord for further troubleshooting help!